
WhatsApp (Beta)
One of our customers' wishes, which has been cherished for years, is to have the communication between RentBuddy and the crew run via WhatsApp.
At the moment, together with some users, we see the great advantages of the current WhatsApp possibilities, despite the limitations and obstacles WhatsApp has. We have now added the current possibilities as an option to RentBuddy version 6.8.
If you want to find out more, please read this page carefully to see if it is right for your organisation and if WhatsApp offers additional opportunities for your crew.
Conditions
In order to use WhatsApp in combination with RentBuddy, you must have a business Facebook account. As we know, the new owner behind WhatsApp is the company Meta.
click here to create or manage a facebook account.
In addition to this business account, you must also have a mobile number that has not been linked to a Facebook account elsewhere or previously.
In addition, you cannot just start sending messages to WhatsApp. The biggest impact of the link is that without permission from your crew, no communication is possible. After all, they want to prevent abuse (of spam). That is why you have to create templates in your account, which must be approved by WhatsApp in advance. This approval normally happens quite quickly. In our experience, if the conditions are met, your template is often approved within 15 minutes.
Your business account must also be verified. If this has not yet happened, go through this process first.


Activate Messagebird API
https://www.messagebird.com: To integrate with WhatsApp, we use the MessageBird WhatsApp API. What you have done so far is all FREE but the API is of course tied to a paid account. Go to www.messagebird.com and create your account. A WhatsApp message costs per conversation approximately : €0.1230 cents (as of 1-7-2022) and per message €0.0045 cents). By the way, the first 1000 messages per month are FREE and/or check with Messagebird. For our large users you can also choose packages starting from € 45 per month.
On your Messagebird account dashboard, choose Install WhatsApp / Channel. Allow yourself to be guided through the many questions required to identify your identity as a company. Next, create a WhatsApp channel . Through this channel, you will have to go through another approval process. You have to link your phone number to the WhatsApp channel, you have to fill in the company data correctly and finally you will receive a so-called WABA ID with which your account will be approved by Messagebird.
Once you have created your channel, go to Channels -> WhatsApp and choose your channel. Under your phone number you will see your channel ID, which you will need in the next step when linking with RentBuddy.


WhatsApp management
Log in to your facebook business account and look for WhatsApp administration. As mentioned, you need to associate a unique phone number with the WhatsApp Manager. Once it is verified, you can use the number to communicate with WhatsApp. But we are not there yet. As mentioned, you then need to create templates that need to be approved.

Creating Templates
- As mentioned, you can only communicate using approved templates. These can be created in your facebook account, but we don't do that. Only templates created through your Messagebird account are supported by RentBuddy. You have to create this template in order for it to be approved. There are already a number of example templates, but we create our own template, which we call CrewBackStage for example . If you are going to work with multiple companies within RentBuddy, you have to create a set of templates for each company. In addition, a new freelancer will only see your phone number. To show with whom he communicates, it is wise to put the name of your company in your template.
- Choose WhatsApp -> Template Manager
- You choose one of the categories that your template complies with. This is not so precise because RentBuddy does not do anything else with it.
- We fill in the unique name of the template that we will soon see in RentBuddy.
- We select the language(s) of the template.
Important TIP!
If you have named a template and delete it and want to create it again, it MUST be renamed. A template once created in MessageBird may not be reused for at least 30 days after deletion. You won't get any error messages about this but it is the cause that they won't be visible anymore.
The next steps:
- First of all, we choose the Header (at least this is optional). Choose an Image, for example.
- The Body ultimately contains the most important information. RentBuddy uses a parameter that can be used in the template through {{...}} (double brackets, see above)
- The variable is, of course, later modified with the text template and data from RentBuddy.
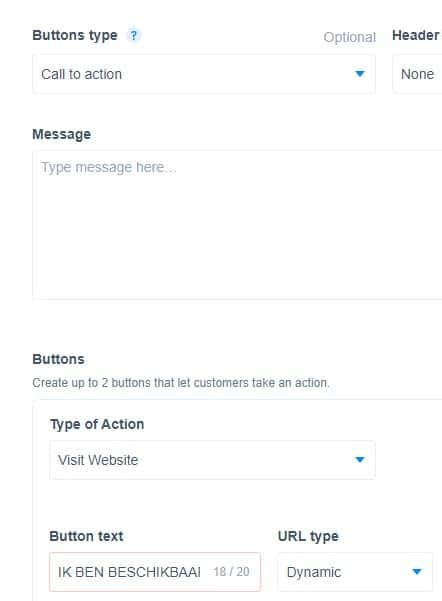
- You will also see the button CONFIRMED OPERATION. Your template must be of the type Call to Action in order to add buttons. Do this for an invitation message because then the schedule can be updated automatically.
- In order to create the button with the text CONFIRMED or I AM AVAILABLE (you can choose the text yourself up to a maximum of 20 characters), you need to choose the type Visit Website. The URL type must be Dynamic because we change the URL for each schedule.
- To fix your own website URL, please contact our helpdesk. They will then pass on your URL.
- You can create an additional button to call a direct number from your schedule, for example, which will allow the employee to call at the push of a button.
If you think your template is correct, click on Send and after a short check your template will be submitted for verification. If you create a template in this way you will see that within a short time the message follows: Approved
PLEASE NOTE: Once templates are submitted, they cannot be modified and you will have to make a new one if, for example, changes or typing errors are made. Please check this carefully in advance.
Create a set of templates
Every company (with its own planning) needs to create a set. After all, in addition to inviting your employees, you may also want to confirm or reject employees via WhatsApp. Suppose you have named your template crewbackstage. Then there should also be a template called crewbackstage_accept (for the confirmed schedules) and a crewbackstage_reject (to let your staff who have made themselves available know that you will not be using their services). So the _accept and _reject come after the name of your invitation template.
All three templates must be approved before we can proceed.
start_whatsapp
There is a special template that needs to have the name start_whatsapp. Please note that you can only create it once and cannot change it. After deleting it, it is only possible again after 30 days. So only submit this template if you are 100% sure of your text.
This template is intended to be used in case of problems the first time you invite an employee or to simply test your settings.
The template must be of the Buttons type Quick Reply. The message can then be :
The planning department would like to get in touch with you via WhatsApp. Would you therefore like to sign up for contact or give a comment below?
You can then create a button at the bottom with a message such as CONTACT ACCORD (this is then a quick response).
This opens the conversation between WhatsApp and RentBuddy. We also send this template in for verification.
RentBuddy settings
If everything has been installed correctly so far, we will now move on to the final step. We are going to record the links in RentBuddy. This should not be forgotten either, but if everything has been entered correctly, we can carry out our first tests in a few minutes.
In version 6.8 (or higher), WhatsApp is set in the administrator settings. After all, it is possible to support a separate link for each administration. So choose Financial, Fixed data, Administration, Administrations and click the Staff planning button.
The fields to define are:
- the Messagebird.com API key
This is the API key found in several places in your account. Sometimes on your Messagebird.com dashboard in the top right corner and otherwise under Developers. In your API keys select the LIVE key or TEST key, copy it and/or enter it here.

You can get the other information from your WhatsApp channels from the screen above:
-Channel ID
The channel ID can be found under your phone number behind Channel ID. Cut and paste this key into your account one by one.
-Namespace/Namespace code
Here you must fill in the Namespace ID template .
-Planning telephone number
Here you enter the telephone number you have registered in your Namespace.
NOTE: Now save your settings. If you have filled in the above details correctly, RentBuddy can link to your account and then we can continue.
- Select the approved template you want to use
When your templates are approved, select the template that belongs to the INVITATION from your list.
Don't forget to enter the data first. If your details are entered correctly, you will see the text CONNECTED and the number of credits you have left should also appear.
As you can see, you can then send your first TEST MESSAGE to check that it all works correctly.

Linking text template
Now that we have created the templates in MessageBird, it's time to link the text templates in RentBuddy. You can find these at Relations - Fixed data - Text templates or from the main menu (press F7 twice) and search for text templates.
we have the Personnel Planning group in which we can create as many templates as we like. Suppose we create a WHATSAPP_INVITE (invitation template). When creating it, we choose Use as: in the lower right corner and select Confirmation of Employee Scheduling via WhatsApp.
An example template is :
Hello [TEMPLATE_FIELD_FIRSTNAME], We herewith *confirm* your planning for project:*[TEMPLATE_FIELD_PROJECTNAME]*- Date : *[TEMPLATE_FIELD_DATE]*-Time : [TEMPLATE_FIELD_TIME]-Location: [TEMPLATE_FIELD_CITY]-Function: [TEMPLATE_FIELD_FUNCTION]-Project number: *[TEMPLATE_FIELD_PROJECT NUMBER]*- Comment: [TEMPLATE_FIELD_NOTES].
Tip: WhatsApp already has a restriction here. There can be no hard returns (CR) or tabs in the message. There should be no more than two spaces in the message or a large number of consecutive characters. The asterisks you see in the message are the same as in whatsapp to make fields bold.
Right-click in the text field to see the fields that can be used in your template. You could even specify rates in the message for confirmations, for example.
Here is an example of this template in WhatsApp. Your employee or freelancer can press the button I AM AVAILABLE or CALL TO PLAN to start a phone call immediately.
